
Drawing Faces

By: Brian Sun
Drawing Faces
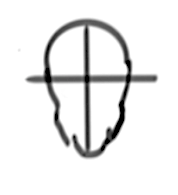
1. Start off with a circle, and from the left and right sides curve inwards, and keep drawing downwards until you get a head shape you like. Draw a chin, that juts out and scale or minimize the size of the chin to determine the physical appearance of the character you are drawing.

2. Erase the bottom lines of the circle and draw a Cross. Depending on which way the face is pointing towards, the Cross can change, curving around the face, and the vertical line can be placed high or low on the face which also is a key component on what the face looks like.
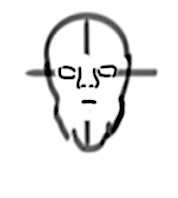
3. Use your fingers and draw a small dent every 1/5 of the way on the vertical line. On the gap in the center of the face, draw a nose, curving down and then curving inwards, creating two holes. On either side of the nose, between either two dents, draw two gaps, but without the iris. Under the nose, draw the mouth, and for simplicity, for now just draw a line.
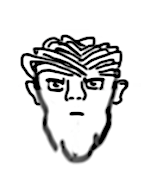
4. Draw irises as circles and have a small gap of white on a specific part of the iris. With ears, draw curves starting from the eye and curving down to the bottom of the nose. Drawing hair is a bit tricky. It really just depends on what hairstyle you want to use. Usually you just draw spikes, without drawing all the hair, but sometimes drawing the hair strands gives it detail and more of a style of your own.
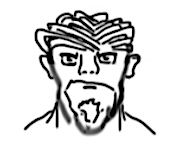
5. Drawing beards and mustaches show how old the person you are drawing is. Drawing mustaches and beards is much like drawing hair, and it is important to show the difference between each character you draw. The neck usually curves down but I have seen people draw too long necks and it’s important to know how they are shaped to create the image you really want.


Brian, this is an awesome continuation of your Exhibition from last year. It’s awesome to see you taking action and using your talents to show the way for others. Proud teacher moment here!
Cool
WOW, Brian, this is amazing and can’t wait to see another of your artwork!